
If you’ve ever felt your heel slip during a fast break or noticed uncomfortable pressure on the sides of your feet while playing, the fix might be simpler than you think—how you lace your Adidas basketball shoes can dramatically affect performance, comfort, and stability. Proper lacing is not just about keeping shoes tied, it is a strategic tool to enhance fit, prevent blisters, and lock down your foot for explosive movements. Whether you are wearing high performance models like the Adidas AE 1 or casual court styles like the Grand Court 2.0, each shoe benefits from a specific lacing technique tailored to its design. In this guide, you will learn the best lacing methods for support, comfort, and style step by step.
Use the Heel Lock for Ankle Stability
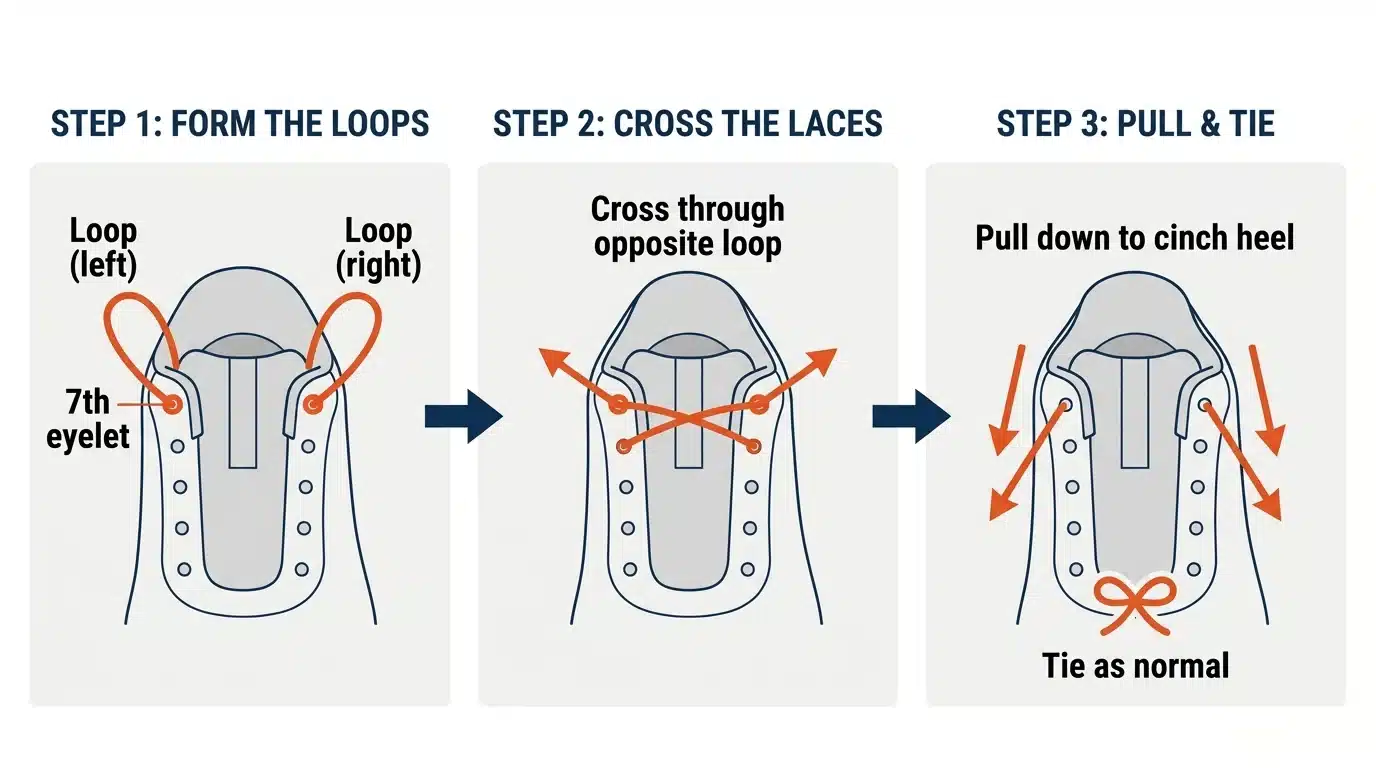
The Heel Lock, also called the Runner’s Loop, is the go to method for athletes who need maximum ankle support and a secure heel fit during quick cuts, jumps, and lateral movements.
Why Heel Lock Works Best
This technique prevents your heel from lifting inside the shoe, which reduces friction, minimizes blisters, and improves control. It works especially well for players with wide feet or those wearing high tops that feel loose around the ankle collar.
Step-by-Step Heel Lock Lacing
• Start with a Criss-Cross: Begin at the bottom eyelets, threading laces from the inside out. Continue the standard diagonal criss-cross pattern up to the second-to-last eyelet on both sides.
• Create Vertical Loops: Instead of crossing over, take each lace and thread it straight up through the top eyelet on the same side. This forms a vertical loop on each side of the shoe.
• Cross Through the Loops: Pull the left lace across to the right side and thread it through the right vertical loop. Repeat with the right lace through the left loop.
• Tighten and Secure: Pull both lace ends outward to cinch the loops down over the ankle collar. This locks the heel firmly into place. Tie a firm knot at the top.
• Final Fit Check: Make sure the tongue is centered and pulled up before tying. This ensures even pressure and prevents slippage.
Pro Tip: For extra security, use a surgeon’s knot which is a double overhand before the final bow to prevent loosening during play.
Apply Ladder Lacing for Even Pressure

Ladder lacing spreads tension evenly across the foot, making it ideal for players who experience pressure points or hot spots with standard criss-cross patterns.
Who Should Use Ladder Lacing
This method works best for wide-footed players or anyone using Adidas models with spaced or wide eyelets. It is also popular among athletes who want consistent lockdown without squeezing the midfoot.
How to Lace in a Ladder Pattern
• Thread Bottom Eyelets: Insert laces from the inside out at the lowest pair. Pull both ends to even length.
• Cross Diagonally: Take one lace and cross it diagonally to the opposite side’s next eyelet up. Pull tight.
• Form Horizontal Rungs: Bring the lace straight across horizontally to the same-level eyelet on the adjacent side. This creates a rung of the ladder.
• Repeat Upward: Continue alternating diagonal pulls with horizontal runs until you reach the top.
• Tie Securely: Finish with a double knot to maintain tension throughout the game.
Visual Cue: When done correctly, the laces form a clean ladder-like structure with parallel horizontal segments between vertical diagonals.
Try Straight Bar Lacing for Narrow Feet

If your feet are narrow or your shoes feel too tight across the top, straight bar lacing offers a snug yet comfortable fit with a sleek appearance.
Benefits of Straight Bar Style
This method reduces inward pinching of the shoe’s sides, making it ideal for narrow feet or high-top basketball shoes where lateral pressure can cause discomfort.
How to Do Straight Bar Lacing
• Begin at the Bottom: Thread both ends through the bottom eyelets from the inside out.
• Go Straight Across: Take one lace and pass it horizontally to the opposite eyelet at the same level.
• Skip and Repeat: On the next level, instead of crossing, bring the lace straight up on the same side. Then go straight across again.
• Alternate Sides: Continue this pattern: horizontal bar, vertical rise on the same side, horizontal bar, creating a series of straight bars across the tongue.
• Finish at the Top: Tie a secure knot. The result is a clean minimalist look with even tension.
Warning: Do not pull too tight. This method works best when allowing natural foot swelling during play.
Hide Laces for a Clean Modern Look
Want a sleek pro-style appearance with no dangling ends? The hidden eyelet method gives your Adidas basketball shoes a clean streamlined finish.
When to Use Hidden Lacing
This technique is perfect for style-focused wearers or players who dislike tripping on laces. It also reduces friction between laces and foot during cuts.
Two Ways to Hide Your Laces
Method 1: Skip Eyelets for No-Show Effect
• Start at the bottom eyelets, threading from inside out.
• Instead of lacing every row, skip every other eyelet.
• Continue skipping until the top, creating long diagonal spans across the tongue.
• Tie at the top. The skipped eyelets stay empty, giving a minimalist look.
Method 2: Tuck Ends Under the Tongue
• Lace normally from bottom to top.
• After tying, push the excess lace ends under the tongue or beneath the laces along the side.
• Smooth them out so no ends stick out.
Best For: Adidas Grand Court 2.0 or any shoe worn casually with a streetwear vibe.
Master the Classic Criss-Cross Pattern
The criss-cross is the most common and versatile lacing style, ideal for everyday wear and general basketball performance.
Why Criss-Cross Still Wins
It is simple, effective, and provides balanced support across the midfoot. This method works on almost all Adidas basketball models, including the AE 1 and Dame series.
How to Criss-Cross Correctly
• Start Inside Out: Thread laces through the bottom eyelets from the inside, so the knot starts clean.
• Cross Diagonally: Pull one lace over to the opposite side’s next eyelet up. Repeat all the way to the top.
• Keep Tension Even: Do not over-tighten any single section. Aim for consistent pull across all levels.
• Secure with a Surgeon’s Knot: Wrap the laces twice before forming the bow to prevent loosening during play.
Pro Tip: Use flat non-elastic laces for better durability and a flatter profile.
Style Up with Bow-Tie Lacing
For fashion-forward players, the bow-tie method turns laces into a statement piece, great for off-court looks or showing personality on the court.
Who Should Try Bow-Tie Lacing
This technique works best for style-focused wearers or those using contrasting-colored laces like red on white shoes to maximize visual impact.
How to Tie a Lace Bow-Tie
• Lace normally using criss-cross or straight bar.
• At the top, instead of a regular bow, form a small figure-eight loop with each end.
• Cross the loops and pull one through the other, just like a classic bow-tie.
• Adjust to sit neatly at the top of the tongue.
Styling Hack: Use thicker or textured laces to make the bow-tie stand out more.
Follow AE 1’s Unique Lacing System
The Adidas AE 1 has a futuristic upper that requires a specific lacing pattern to unlock its full performance potential.
Why AE 1 Lacing Is Different
It uses under-eyelet tensioning and a signature X pattern to stabilize the foot and maintain the shoe’s engineered fit. Skipping steps can lead to poor lockdown.
Step-by-Step AE 1 Lacing
• Thread Downward at the Bottom: Start by pulling laces down through the bottom eyelets, outside to inside.
• Go Under the Next Eyelet: Bring each lace under the second set of eyelets and pull back out. This creates foundational tension.
• Form the First X: Cross one lace over to the first eyelet on the opposite side. Then bring it down and out through the second eyelet on the same side. Repeat on the other side.
• Transition Upward: After the X, pull each lace back out through the next eyelet on the same side. This is counter-intuitive but essential.
• Finish with Standard Lacing: Continue normally through the remaining eyelets to the top.
• Tie and Test Fit: Ensure the heel is locked and the tongue is centered.
Warning: When replacing laces, use the other shoe as a reference. The pattern is complex and symmetry matters.
Lace the Grand Court 2.0 for a Loose Fit

The Adidas Grand Court 2.0 is designed for a relaxed stylish look using a unique loose laced method that hides knots and softens the silhouette.
The Grand Court 2.0 Aesthetic
This method avoids tight knots and instead uses behind-the-tongue loops for a clean effortless fit, perfect for streetwear or casual play.
How to Lace Grand Court 2.0
• Start Outside First Hole: Pull one lace end down through the outside first hole, then bring it up into the shoe.
• Cross Alternating Sides: Take the outside lace to the inside second hole. Take the inside lace to the outside second hole. Keep laces loose. Do not pull tight.
• Skip the Tongue Loop: At the final holes, bring each lace down through its own side’s last eyelet.
• Create Behind-the-Tongue Loops: Push the outside lace up through the inside last hole from below, then pull out to form a loop. Do the same with the inside lace through the outside last hole.
• Tuck Loops Behind Tongue: Gently pull both loops behind the tongue. Shape them to follow the arch curve.
• Repeat on Other Shoe: Match the pattern exactly for symmetry.
Key Rule: Never pull tight. Looseness is intentional and part of the design.
Maximize Tightness with Lock-Down Lacing

For intense games where every inch of foot movement matters, use lock-down lacing to eliminate slippage and boost responsiveness.
When to Use Maximum Tightness
This technique is ideal for competitive play, especially in shoes that feel slightly loose after break-in.
How to Lock Down Your Fit
• Lace normally to the top.
• Pull both ends through the top eyelets again, which is a double-pass.
• Cross them over the top of the shoe before tying.
• Tie a firm knot and tuck ends under the laces.
Result: Increased tension across the forefoot and midfoot for total control.
Fix Common Lacing Problems Fast
Even with the right technique, mistakes happen. Here is how to troubleshoot the most frequent issues.
Heel Slipping During Play
Cause: Not using top eyelets or missing the heel lock. Fix: Re-lace using the Heel Lock method and ensure laces go to the very top eyelet.
Uneven Tension or Fit
Cause: Incorrect crossing direction, especially on AE 1. Fix: Restart and follow the cross to first, down to second rule. Use the other shoe as a visual guide.
Pressure on the Top of the Foot
Cause: Over-tightening or using criss-cross on high arches. Fix: Switch to Ladder or Straight Bar lacing for even pressure distribution.
Laces Unravel During Game
Cause: Weak knot or elastic laces. Fix: Use a surgeon’s knot or switch to flat non-elastic laces.
Tongue Shifting Side to Side
Cause: Poor loop placement or loose threading. Fix: Pull tongue up before final knot or tuck loops behind the tongue, which is the Grand Court style.
Choose the Right Lacing for Your Goal
Not every method works for every situation. Match your lacing style to your priority.
For Maximum Ankle Support
• Heel Lock
• AE 1 Specific Pattern
Both lock the heel and stabilize the ankle, which is critical for aggressive play.
For Wide Feet
• Heel Lock
• Ladder Lacing
These methods distribute pressure and prevent midfoot squeeze.
For Narrow Feet
• Straight Bar Lacing
This prevents excessive inward collapse of the upper.
For Style and Streetwear
• Bow-Tie Lacing
• Hidden Eyelet
• Grand Court Loose
Clean lines, hidden ends, or bold knots make a statement.
For High-Intensity Basketball
• Heel Lock
• AE 1 Pattern
These are engineered for performance, not fashion.
Frequently Asked Questions About Lacing Adidas Basketball Shoes
What is the best lacing method for ankle support in basketball shoes?
The Heel Lock method provides the best ankle support. It creates vertical loops at the top eyelets that cinch down over the ankle collar, preventing heel lift and securing the foot during quick cuts and jumps. This technique is especially effective for high-top basketball shoes.
How do I lace Adidas AE 1 shoes correctly?
The AE 1 requires a specific pattern that starts by threading laces downward through the bottom eyelets. Then, go under the next set of eyelets and form a signature X pattern by crossing to the first eyelet and going down through the second. The key is following the cross to first, down to second rule and using the other shoe as a visual reference for symmetry.
What is the best lacing style for wide feet?
Ladder lacing and Heel Lock are the best methods for wide feet. Ladder lacing distributes pressure evenly across the entire foot, while Heel Lock secures the heel without compressing the midfoot. Both prevent the discomfort that comes from standard criss-cross patterns on wider foot shapes.
How do I get a clean look with hidden laces?
You can achieve hidden laces by either skipping every other eyelet when lacing or by tucking excess lace ends under the tongue after tying. The skip method creates long diagonal spans with a minimalist appearance, while the tuck method maintains tension while eliminating dangling ends.
Why does my heel slip in basketball shoes?
Heel slippage usually happens when laces do not reach the top eyelets or when the Heel Lock technique is not used. The solution is to relace using the Heel Lock method, making sure to thread through the very top eyelet and create the locking loops that secure the heel counter.
Can lacing technique affect basketball performance?
Yes, proper lacing directly impacts performance. The right technique provides ankle stability, prevents foot slippage, distributes pressure evenly, and maximizes control during explosive movements. Using model-specific lacing like the AE 1 pattern ensures you get the engineered fit designed for basketball performance.
Key Takeaways for Lacing Your Adidas Basketball Shoes
Proper lacing is one of the easiest and most effective ways to upgrade your Adidas basketball shoes. Start with the Heel Lock method for competitive play or the Grand Court loose technique for streetwear style. Remember to use flat non-elastic laces for better durability and control, and always check symmetry between both shoes when using complex patterns like the AE 1 specific lacing. Whether you are locking in for a championship game or stepping out in style, the right technique makes all the difference in comfort, stability, and performance.