You’ve finished a game, packed your gear, and realized you cannot fit your soccer ball in the bag. Or maybe you are shipping it overseas, storing it for months, or adjusting its firmness for a younger player. Whatever the reason, knowing how to deflate a soccer ball properly is essential to avoid damaging it. A poorly deflated ball can suffer from torn valves, creased panels, or permanent warping, especially if it is a high-performance, thermally bonded model.
The good news is that deflating a soccer ball is quick, easy, and safe when done correctly. With just a pump needle and a few seconds of effort, you can reduce its size by up to 70 percent, making it ideal for travel, compact storage, or donation. In this guide, you will learn exactly how to deflate any soccer ball safely, step by step.
Identify Your Soccer Ball Type
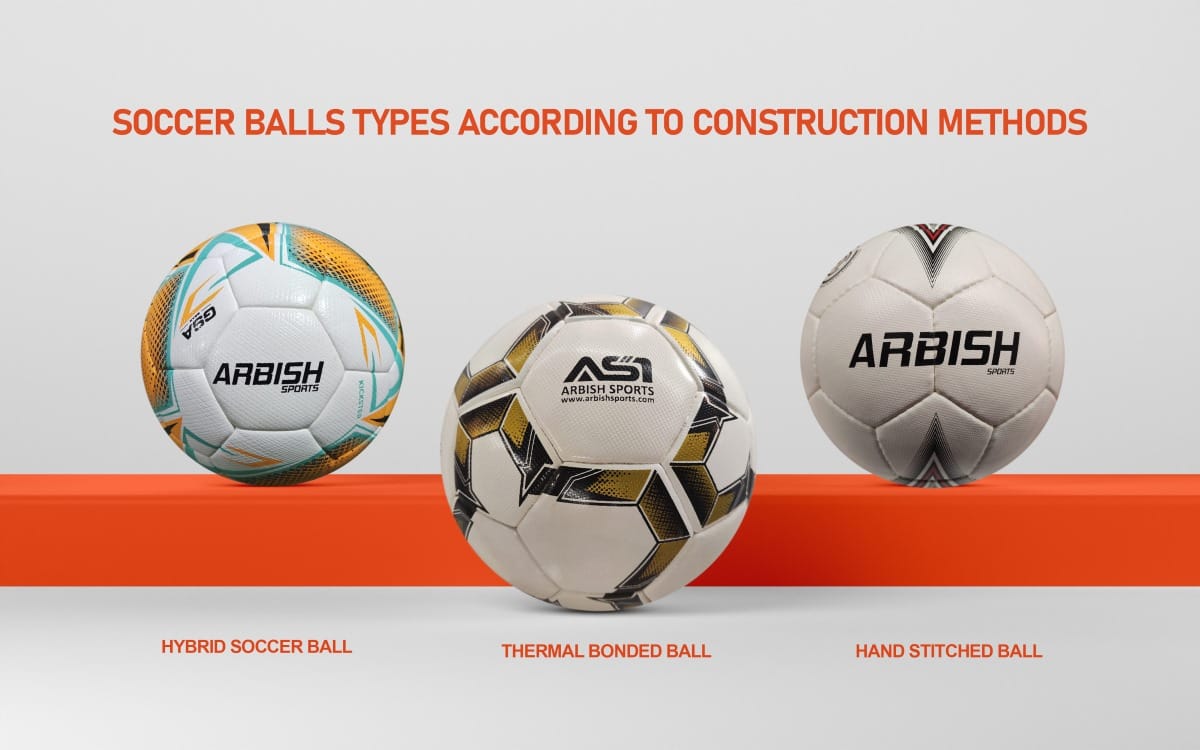
Before inserting any tool, determine your ball’s construction. The method and extent of deflation depend entirely on whether it is stitched or bonded.
Stitched Balls: Safe for Full Deflation
Stitched soccer balls, whether hand- or machine-stitched, feature panels sewn through an inner bladder. This design allows full and repeated deflation without risk of damage.
How to identify stitched balls:
• Look for visible stitching lines between panels
• The valve is usually a small, raised black rubber plug
• These balls can be folded in half after deflation for ultra-compact packing
Stitched balls are commonly used for training, youth play, and travel due to their durability and flexibility.
Bonded Balls: Partial Deflation Only
Thermally or fusion-bonded balls have panels glued together under heat, creating a seamless, aerodynamic surface. Common in match-grade and professional models, they offer superior performance but are not designed for full deflation.
How to identify bonded balls:
• Smooth, seamless surface with no visible stitching
• Valve may be recessed or flush with no visible rubber
• Common on balls like SUMMIT Evolution X, Puma Orbital, and Adidas Finale
Critical rule: Never fully deflate a thermally bonded ball. Doing so can void warranties and cause creasing, delamination, or permanent panel deformation.
Gather the Right Tools

Using the correct tools protects your ball’s valve and ensures clean, repeatable deflation.
Use Only a Pump Needle
The inflation needle, included with most manual or electric ball pumps, is the only safe tool for deflation. It is designed to open the internal valve without tearing the rubber seal.
• Standard size fits 95 percent of soccer balls
• Some premium balls may require a specialized needle, so check manufacturer instructions
• Never substitute with paperclips, pins, or other improvised objects
Always Lubricate the Needle
Applying lubrication prevents friction, reduces wear on the valve, and ensures smooth insertion.
Recommended lubricants:
• Vegetable oil
• Glycerin
• Silicone oil
• Sewing-machine oil
• Saliva in emergencies
Apply a small amount of oil or saliva to the needle tip before insertion. Lubrication is the number one factor in extending valve life. Skipping it leads to premature air leaks.
Avoid These Dangerous Tools
Never use improvised objects. They can destroy the valve or puncture the bladder permanently.
Tools to avoid:
• Paperclips: Jagged edges tear rubber
• Toothpicks: Fragile, can break inside the valve
• Pins or sewing needles: Too thin and sharp, causes permanent leaks
• Pens, nails, or scissors: Destroy internal mechanism
Expert consensus states that if you do not have a pump needle, do not attempt deflation. Borrow or buy one instead.
Locate and Prepare the Valve
The valve is the only safe entry point. Damaging any other part of the ball can render it unusable.
Find the Valve
The valve is typically located at a panel intersection, often near the brand logo.
Standard valve appearance:
• Small black rubber plug, 5 to 8 mm wide
• Slightly raised from the surface
• Contains a ball-check seal that opens under pressure and reseals when the needle is removed
On modern bonded balls, the valve may appear solid or flush. Do not be fooled. A lubricated needle will open the internal mechanism safely.
Prepare the Needle
Follow these steps:
- Remove the needle from your pump
- Apply a drop of oil or saliva to the tip
- Hold it steady and avoid touching the tip with dirty fingers
Store your needle in a small pill bottle to prevent loss between uses.
Insert the Needle Correctly
Proper insertion prevents valve tears and ensures smooth airflow.
Use a Twisting Motion
• Align the needle straight with the valve opening
• Apply gentle forward pressure while twisting slowly, like screwing in a lightbulb
• Do not force it straight in, as this can puncture the bladder or tear the seal
If you feel resistance, stop, withdraw, realign, and try again. Forcing the needle is the leading cause of valve damage.
Handling Recessed Valves
On modern bonded balls, the valve may appear solid. The valve is still there, hidden beneath the surface.
• A lubricated needle will naturally displace the internal ball or flap
• Air begins to escape immediately once the seal opens
• The valve is designed to open under reverse pressure when a needle is inserted correctly
Release the Air Safely
How you release air depends on your ball type. One method fits all could mean permanent damage.
For Stitched Balls: Deflate Fully and Quickly
Once the needle is in place, air will hiss out naturally.
To speed up deflation:
• Gently squeeze the ball
• Kneel on the ball
• Sit on the ball with slight pressure
• Place a towel over it and press with one leg
These balls can be fully collapsed and even folded in half without risk.
For Bonded Balls: Deflate Partially and Slowly
Let air escape naturally. Do not compress the ball aggressively.
• Stop when the ball feels slightly softer but still holds its shape
• Target 30 to 50 percent deflation
• Avoid visible dimpling or folding
Warning: Aggressive pressure can cause internal delamination, even if damage is not visible immediately.
Monitor Firmness
• For play adjustment: Press the ball with your palm. It should give slightly but snap back.
• For storage or travel: Stitched balls can go completely soft. Bonded balls should never lose structural integrity.
Remove the Needle Properly
The final step ensures your ball reseals and holds air when reinflated.
Pull Straight Out
• Remove the needle vertically, without wiggling or twisting
• This prevents tearing the valve’s internal seal
Listen for the Hiss
A brief hissing sound after removal is normal. The rubber valve reseals automatically within seconds.
Post-check: If air continues to leak, the valve may be damaged or dirty. Clean gently with a damp cloth and retry. Persistent leaks mean the ball needs replacement.
Store the Ball Correctly
How you store a deflated ball affects its lifespan and performance.
Ideal Storage Conditions
• Location: Cool, dry place like a closet or shelf
• Temperature: Stable, room-temperature environments only
• Avoid direct sunlight, as UV degrades rubber
• Avoid garages or car trunks with temperature extremes
• Avoid damp areas that pose mold risk
Folding and Packing Tips
For stitched balls:
• Can be folded in half, known as the taco style
• Secure with a rubber band
For bonded balls:
• Store flat or loosely rolled
• Never fold
Travel hack: Tape the pump and needle to the deflated ball so they do not get lost.
Avoid Common Deflation Mistakes
Even small errors can shorten your ball’s life or ruin it entirely.
Mistake: Using a Paperclip or Pin
Risk: Tears valve, punctures bladder, causes permanent leaks. Solution: Only use a proper pump needle.
Mistake: Forcing the Needle
Risk: Misaligned insertion, torn rubber seal. Solution: Lubricate and twist gently. Realign if stuck.
Mistake: Over-Deflating Bonded Balls
Risk: Creasing, delamination, warping. Solution: Partial deflation only. Stop before soft collapse.
Mistake: Skipping Lubrication
Risk: Micro-tears in valve, reduced air retention over time. Solution: Always apply oil or saliva.
Mistake: Long-Term Deflation
Risk: Rubber components stick together, especially in butyl bladders. Solution: Do not store deflated for more than 2 to 3 months.
Leaving a ball deflated for more than a few months can cause the rubber to stick together and degrade.
When and Why to Deflate a Soccer Ball
Understanding the purpose helps you choose the right deflation level and method.
Travel by Air
• Why: Air pressure changes in cargo holds can burst overinflated balls
• Action: Partially or fully deflate based on ball type
• Tip: Carry on to avoid extreme pressure shifts
Long-Term Storage
• Why: Reduces stress on seams and bladder
• Action: Full deflation for stitched, partial for bonded
• Check: Reinflate and inspect every 6 to 8 weeks
Donation or Shipping
• Why: Fit multiple balls in small boxes like shoebox-sized donation kits
• Action: Fully deflate stitched balls, fold and rubber-band
• Bonus: Attach pump and needle for the recipient
Adjusting Play Feel
• Why: New balls are often overinflated and too hard
• Action: Release 10 to 20 percent of air for softer touch
• Test: Press with palm. It should feel responsive but not rigid.
Maintain Your Ball Beyond Deflation
Proper care ensures long life, consistent performance, and easier future deflation.
Reinflate to Correct Pressure
• Check the label: PSI or bar is printed on the ball
• Typical range: 8.5 to 15.6 psi or 0.6 to 1.1 bar
• Use a gauge: Do not rely on feel alone
Overinflation causes burst risks. Underinflation hurts bounce.
Clean After Every Use
• Wipe down with a damp cloth to remove dirt, mud, and grass
• Never submerge in water
• Never use harsh chemicals
• Never machine wash
• Air dry at room temperature, away from heaters or direct sun
Inspect Regularly
Check for:
• Hissing sounds indicating air leaks
• Seam separation
• Surface cuts or abrasions
Fix early. Small issues become big problems if ignored.
Frequently Asked Questions About Deflating a Soccer Ball
Can I use a paperclip to deflate a soccer ball?
No. Paperclips have jagged edges that can tear the valve rubber or puncture the bladder. Always use a proper pump needle with lubrication. Improvised tools cause permanent damage that cannot be repaired.
How do I know if my soccer ball is stitched or bonded?
Look at the surface. Stitched balls have visible stitching lines between panels. Bonded balls have a smooth, seamless surface with no visible stitching. The valve on bonded balls may also appear recessed or flush.
Can I fully deflate a thermally bonded soccer ball?
No. Thermally bonded balls should only be partially deflated, about 30 to 50 percent. Full deflation causes creasing, delamination, and permanent panel deformation. Only stitched balls are safe for full deflation.
How long can I store a deflated soccer ball?
Do not store a deflated ball for more than 2 to 3 months. Longer periods cause the rubber components in the bladder to stick together and degrade. For long-term storage, check and reinflate every few weeks.
What happens if I force the needle into the valve?
Forcing the needle tears the internal rubber seal or misaligns the valve mechanism. This causes permanent air leaks. Always lubricate the needle and use a gentle twisting motion. If you feel resistance, withdraw and realign before trying again.
Why does my ball hiss after I remove the needle?
A brief hissing sound is normal and stops within seconds as the valve reseals. If air continues to leak, the valve may be damaged or dirty. Clean gently with a damp cloth and try again. Persistent leaks indicate the ball needs replacement.
Key Takeaways for Deflating Your Soccer Ball
Properly deflating a soccer ball is a simple skill that protects your investment and extends play life. Always use a lubricated pump needle, know your ball type, and store it correctly.
The most important points to remember are these three. First, identify whether your ball is stitched or bonded before deflating. Stitched balls can be fully deflated, while bonded balls require partial deflation only. Second, always use a proper pump needle with lubrication. Never use paperclips, pins, or other improvised tools that can destroy the valve. Third, store deflated balls properly in a cool, dry place. Do not leave them deflated for more than a few months, and avoid folding bonded balls.
Whether you are packing for travel, adjusting firmness for practice, or preparing a donation, these steps ensure your ball stays game-ready for years to come.