
If your Nike basketball shoes don’t fit right, the problem might not be the shoe. It is how you are lacing them. The way you lace your Nikes directly impacts performance, comfort, and injury prevention. Whether you are cutting hard on the court or stepping out in style, mastering the art of lacing transforms your fit. This guide covers every essential lacing technique, lace type, and pro tip to help you lock in securely and look sharp on and off the hardwood.
From heel lock techniques that stop slippage to clean, tucked styles for a sleek look, the right method makes all the difference. You will learn specific lacing patterns for different foot types, when to use each technique, and how to maintain your laces for peak performance.
Crisscross Lacing for Balanced Fit
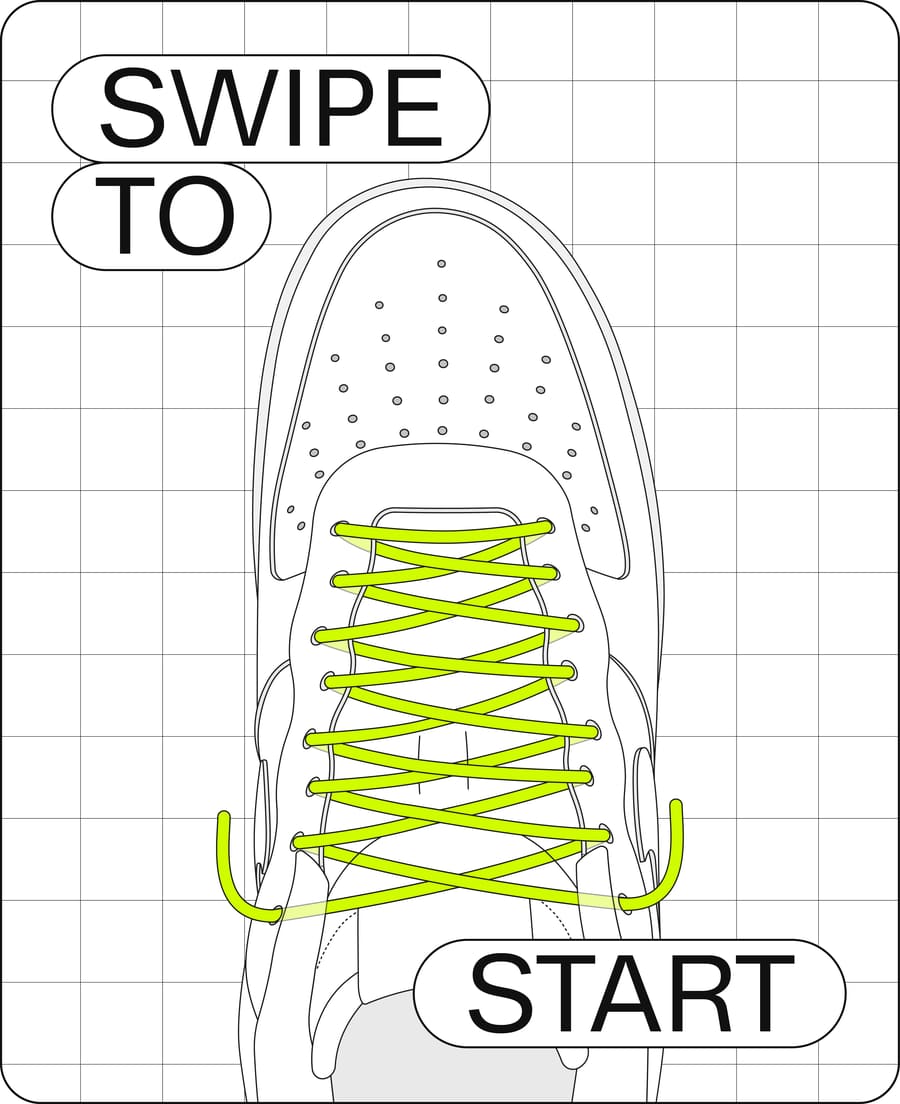
The crisscross method is the foundation most players use. It delivers even tension across the foot, stabilizes the midfoot, and supports quick movements during play. This technique works well for everyday wear and general basketball action.
Standard Crisscross Technique
Start by inserting the lace into the bottom eyelets from the inside, pulling both ends out with equal length. Cross the laces over the tongue and thread each into the opposite eyelet above. Continue upward, maintaining consistent pull on both sides to avoid pressure imbalances. Finish with a double knot at the top to prevent loosening during play.
This method is simple, reliable, and compatible with all Nike basketball models from the LeBron series to Kyrie Low. For optimal results, check that no section feels tighter than another. Uneven tension causes blisters or hot spots during extended play.
When to Use Crisscross
Choose crisscross lacing if you want a secure, all-around fit without complexity. It is ideal for players with average foot width and arch height. Since it uses every eyelet, you maximize support across the entire upper. This is especially important in high-top models like the Nike Air Zoom GT Cut, where full lockdown prevents ankle roll.
Avoid skipping eyelets unless you have specific fit issues. Using all holes ensures the shoe’s Flyknit or synthetic upper stays tensioned properly. If you notice heel slippage, pair crisscross with a heel lock at the top for added stability.
Straight Bar Lacing for Even Pressure

Straight bar lacing eliminates diagonal tension, replacing it with horizontal bars that apply uniform pressure across the foot. This method is perfect for wide feet or anyone who feels pinching across the instep.
Step-by-Step Bar Lacing
Thread both lace ends down into the bottom eyelets. Take the left lace and skip the next hole, bringing it up through the third eyelet from the bottom, from underneath. Now cross it over the tongue and feed it down into the corresponding third eyelet on the right side.
Repeat the pattern: skip an eyelet, go up from beneath, cross, and go down from above. Continue until all eyelets are used. The result is a clean, ladder-like appearance with no crisscrossing on the outside. To finish, tuck excess lace behind the tongue or tie a hidden knot inside the shoe.
Benefits of Bar Lacing
This technique reduces pressure points by distributing force evenly across the foot. Unlike crisscross lacing, which pulls diagonally and can squeeze the midfoot, bar lacing applies direct horizontal tension ideal for high-volume feet. It also gives shoes a structured, custom look favored in streetwear circles.
Use this method on models like the Nike Blazer Mid or Dunk High when comfort is a priority. It works well with flat laces, which lie flatter and enhance the clean aesthetic. Ensure your laces are long enough, typically 48 to 54 inches depending on eyelet count.
Heel Lock Lacing for Ankle Stability
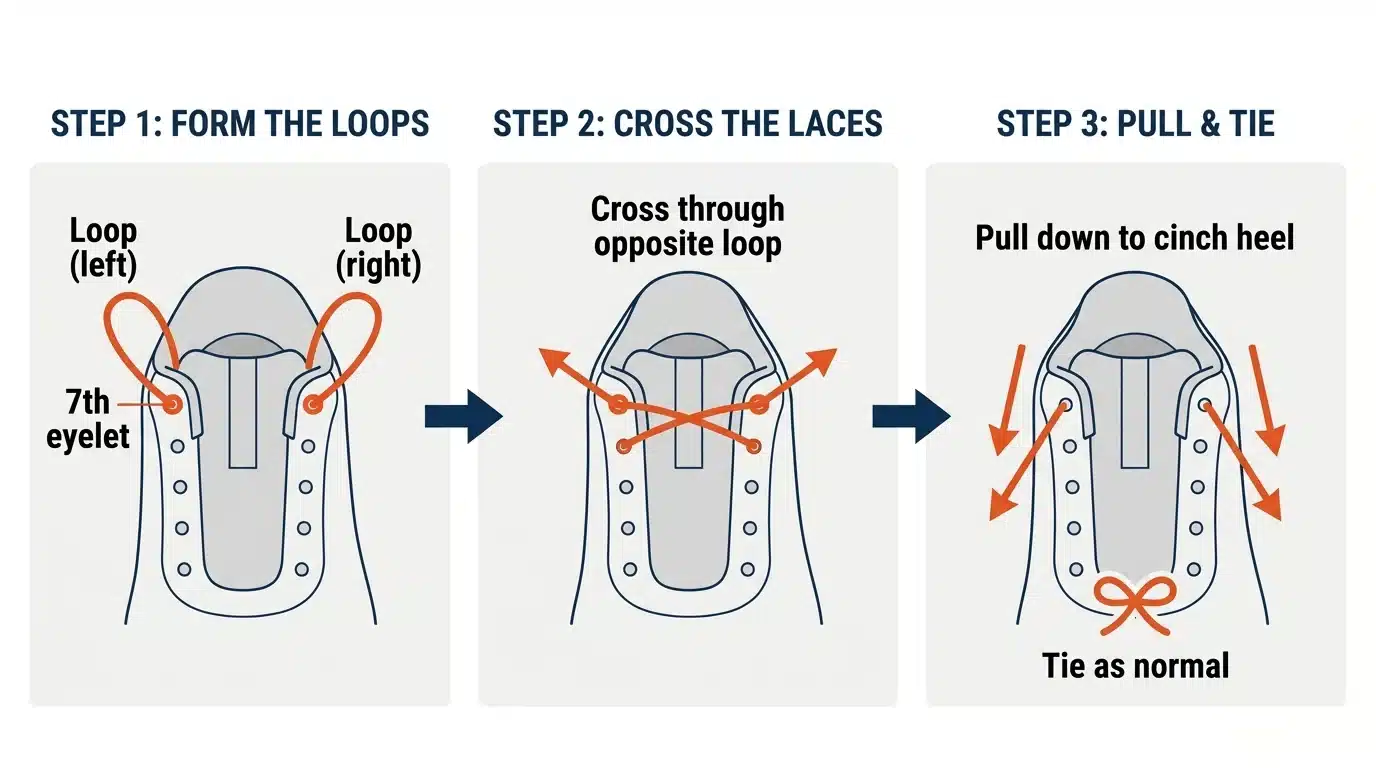
Heel lock lacing, also known as loop-back or runner’s loop, is a game-changer for basketball. It locks your heel firmly into the heel cup, eliminating slippage during cuts and jumps.
Apply the Heel Lock Method
Start by lacing normally with a crisscross pattern up to the second-to-last eyelet. At this point, instead of crossing over, thread each lace straight up through the top eyelet on the same side. This creates a small loop on each side near the ankle.
Now cross the laces and pull each end through the opposite loop. Pull down and outward to tighten the loops, cinching the collar around your ankle. Once snug, tie the laces in a standard double knot. The heel should feel secure with zero lift when you walk or pivot.
Who Needs Heel Locking
Players prone to ankle rolls or those wearing low or mid-top basketball shoes benefit most. Models like the Nike GT Hustle or Precision often lack high-top support, making heel locking essential. Even in high-tops like the Jordan 36, this method improves lockdown during aggressive drives.
If you feel your heel lifting during play, this is the fix. It is especially useful for narrow heels or wide shoes where the ankle collar does not hug tightly. Combine it with round laces for maximum durability and tension retention.
Custom Midfoot Lockdown Techniques

For explosive players who need maximum stability, custom midfoot lacing adds extra tension where it matters most. This technique concentrates tension in the arch and metatarsals, reducing internal movement during sudden stops.
Boost Midfoot Support
Begin lacing normally up to the midfoot eyelets, the area just below the ankle. At this point, instead of continuing upward, pull both lace ends down through the lowest available midfoot eyelets and loop them back up through the next set.
Repeat this crisscross looping within the midfoot section to create multiple anchor points. This double-wrap effect compresses the upper tightly around the foot’s arch and metatarsals. Continue lacing upward normally and tie off at the top.
Prevent Foot Sliding
This technique is ideal for wide-footed athletes or those playing in slightly roomy shoes. By concentrating tension in the midfoot, it counteracts foot slide during sudden stops. Use it in models like the Nike React G.T. Run, which prioritize cushioning over snugness.
Be careful not to overtighten. Your toes should still wiggle freely. If you feel numbness or tingling, ease the pressure. This method works best with round or waxed laces, which resist stretching under high tension.
Adjust Lacing for Arch Type

Your arch type determines how you should lace your shoes. High arches and flat feet require different approaches to achieve optimal comfort and support.
Skip Eyelets for High Arches
If you have high arches, standard lacing can press painfully on the top of your foot. Relieve pressure by skipping one or two eyelets in the middle section. Start with crisscross lacing, but when you reach the tightest part, usually eyelets 3 through 5, bypass them. Instead, go from the second eyelet directly to the fourth or fifth, creating a bridge over the instep.
This opens up space without sacrificing overall support. The shoe still locks down at the heel and forefoot, but the arch area breathes. It is a common fix for players wearing Air Jordan 1s or Nike SB Dunks, which often have stiff uppers.
Tighten for Flat Feet
Low-arch or flat-footed players need more structural support. Use all eyelets and apply firm, even tension throughout. Avoid skipping holes, as this weakens the upper’s ability to stabilize the foot. Opt for round laces, which allow tighter cinching and better force transfer.
Consider pairing full lacing with a performance insole for added arch support. This combo works well in neutral shoes like the Nike Precision 6, giving flat-footed athletes the stability they need during lateral movements.
Choose the Right Laces

The shape of your laces affects fit and security. Choosing the right type for your activity level makes a significant difference in comfort and performance.
Flat vs. Round Laces Compared
Flat laces are common on lifestyle models like the Air Force 1. They stay tied well and give a classic, casual look. However, they can feel bulky and do not cinch as tightly as round laces.
Round laces, found on performance basketball shoes like the Nike Zoom Freak, are thinner and more flexible. They glide smoothly through eyelets and allow for tighter, more precise tensioning. This makes them ideal for competitive play. The downside is they are more likely to come undone unless double-knotted.
For game-day use, choose round laces. For streetwear, flat or waxed laces add style and durability.
Specialty Laces for Performance
Elastic laces offer a dynamic fit that expands with your foot during activity. They eliminate tying altogether. Just slip on and go. This is great for quick workouts or players who hate retying mid-game. Reflective laces boost visibility for outdoor night games. Waxed cotton laces hold knots better and resist moisture, perfect for all-weather play.
When switching lace types, ensure the length matches your shoe’s eyelet count. Use a lace length chart or measure your old pair. Too short and you cannot tie. Too long and they drag or tangle.
Style-Forward Lacing Hacks
The way you lace your shoes creates your look. These techniques give you different aesthetics while maintaining functionality.
Loose Lacing for Slip-On Ease
Want the look of a high-top without the hassle? Try loose lacing for a slip-on fit. Start by feeding both lace ends down into the bottom eyelets. Then bring one lace over the tongue and down into the second eyelet on the same side. Repeat on the other side. Continue this over and down motion upward.
At the top, pull the lace down from above the final eyelet. For a cleaner finish, thread one end up through a phantom eyelet, just above the shoe, and tuck it behind the tongue. This method works best on Nike Dunk Highs or Jordan 1 Mids, giving a relaxed, street-ready vibe.
Clean Tuck for a Polished Look
For a pro-style finish, use tight and clean lacing. Lace with high tension, ensuring no slack. Tie a firm double knot at the top, then tuck the ends completely underneath the crossed laces or along the shoe’s sidewall. This hides loose ends and prevents tripping.
Popular in NBA locker rooms, this method keeps laces secure during intense play. It is also ideal for matching team colors without visible knots. Use waxed or round laces for a sleeker profile.
Maintain and Replace Laces
Even the best lacing fails if your laces are worn. Regular maintenance extends their life and keeps your shoes performing at their best.
Spot When to Replace
Replace laces at the first sign of fraying, discoloration, or stretched-out material. If knots keep coming loose or the lace feels mushy, it is time for new ones. Most players should swap laces every 6 to 12 months, depending on usage.
Frayed laces can snap mid-game, leading to sudden instability. Damaged aglets, the plastic tips, make threading difficult and accelerate wear. Do not wait. Keep a spare pair on hand.
Clean Laces Properly
To extend lace life, clean them monthly. Remove and soak in warm, soapy water for 10 minutes. Gently scrub with a soft toothbrush to remove dirt. Rinse thoroughly and air dry. Never machine wash or use bleach, as this breaks down fibers.
Store extras in a small pouch to prevent tangling. Keep them away from moisture and direct sunlight to avoid fading and weakening.
Avoid Common Lacing Mistakes
Many foot problems stem from simple lacing errors. Fix these issues before they cause pain or injury.
Fix Overtightening and Slippage
Overtightening cuts off circulation, causing numbness and pain. Your fit should be snug, not constricting. Use the wiggle test. After lacing, move your toes. If they cannot wiggle, loosen slightly.
Heel slippage? Perform the shake test. Lift your foot and shake it side-to-side. If your heel lifts, apply heel lock lacing. Uneven tension causes blisters. Always pull both sides equally and check symmetry.
Using the wrong laces reduces performance. Flat laces on a high-intensity game may loosen. Round laces on a casual Dunk might dig in. Match lace type to your activity.
Key Takeaways for Lacing Nike Basketball Shoes
How you lace your Nike basketball shoes is not just about looks. It is about performance, safety, and fit. From crisscross and heel lock to bar and slip-on styles, each method serves a specific purpose. Choose based on your foot shape, play style, and needs. Use the right laces, maintain them properly, and avoid common errors. Whether you are dominating the court or turning heads on the street, the perfect lace job starts with choosing the technique that fits your game.
Frequently Asked Questions About Lacing Nike Basketball Shoes
What is the best lacing method for basketball?
The crisscross method combined with heel lock lacing provides the best security for basketball. Crisscross gives even tension across the foot, while heel lock prevents heel slippage during lateral movements and jumps.
How do I stop my heel from slipping in my Nike basketball shoes?
Apply the heel lock technique. Thread laces vertically through the top eyelets on the same side, creating loops. Cross the laces and pull them through the opposite loops, then cinch tight before tying. This locks the heel firmly in place.
Should I use flat or round laces for basketball?
Round laces are better for basketball. They allow tighter tensioning, provide better lockdown, and are more durable for intense play. Flat laces are better suited for casual wear and streetwear aesthetics.
How often should I replace my basketball shoe laces?
Replace basketball shoe laces every 6 to 12 months, depending on how often you play. Replace immediately if you notice fraying, loss of elasticity, or if knots no longer hold securely.
Can lacing affect ankle support?
Yes, lacing directly affects ankle support. Using all eyelets with a crisscross pattern provides maximum support. Low-top shoes benefit especially from heel lock lacing to compensate for the lack of high-top ankle coverage.