
New basketball shoes often feel stiff and snug, sometimes painfully so. While that initial tightness might seem like a sign of support, it can actually hinder performance and increase injury risk if not properly addressed. The process of how to loosen basketball shoes is not just about comfort; it is about molding the shoe to your foot’s unique shape to prevent blisters, reduce strain, and support dynamic movements like cuts, jumps, and sprints. According to sports medicine research, improper footwear fit contributes to foot and ankle injuries, with NBA players recording over 500 ankle injuries in just five seasons.
The good news is that most basketball shoes can be safely loosened using targeted techniques based on material, fit issues, and urgency. Whether you are dealing with a tight toe box, heel slippage, or overall snugness, this guide delivers proven step-by-step methods from gradual wear protocols to mechanical stretching and heat-assisted softening. You will learn how to stretch leather, mesh, and synthetic uppers without damage, use lacing tricks for instant relief, and avoid common mistakes that could ruin your shoes.
Know Your Shoe Material First

Choosing the right loosening method starts with identifying your shoe’s upper material. Different fabrics respond uniquely to heat, moisture, and pressure, and using the wrong technique can damage the shoe or shorten its lifespan.
Leather Needs Patience and Care
Genuine leather basketball shoes are durable and mold well over time, but they require the longest break-in period. They respond best to conditioning, controlled moisture, and gradual wear. Avoid direct high heat, which can dry out and crack leather. Instead, use warm water soaks or leather softeners to open the fibers, then wear thick socks to stretch while drying. Never leave leather shoes near radiators or in direct sunlight after wetting.
Mesh and Knit Are Naturally Flexible
Shoes made with engineered mesh or knit uppers are designed for immediate comfort and minimal break-in. These materials conform quickly to your foot with just a few indoor sessions. While they do not need aggressive stretching, targeted lacing adjustments can relieve pressure points. Avoid soaking or excess heat, as moisture can degrade adhesives and padding.
Synthetics Vary: Check the Finish
Synthetic leather, plastic overlays, and PVC materials offer support but are prone to warping under heat. These shoes benefit from low-heat methods and mechanical stretching. Avoid hair dryers on high settings or freezing techniques, which can cause delamination or cracking. For hybrids combining mesh and synthetic, pair gradual wear with damp newspaper stuffing for balanced expansion.
Break In Gradually: The Safest Method
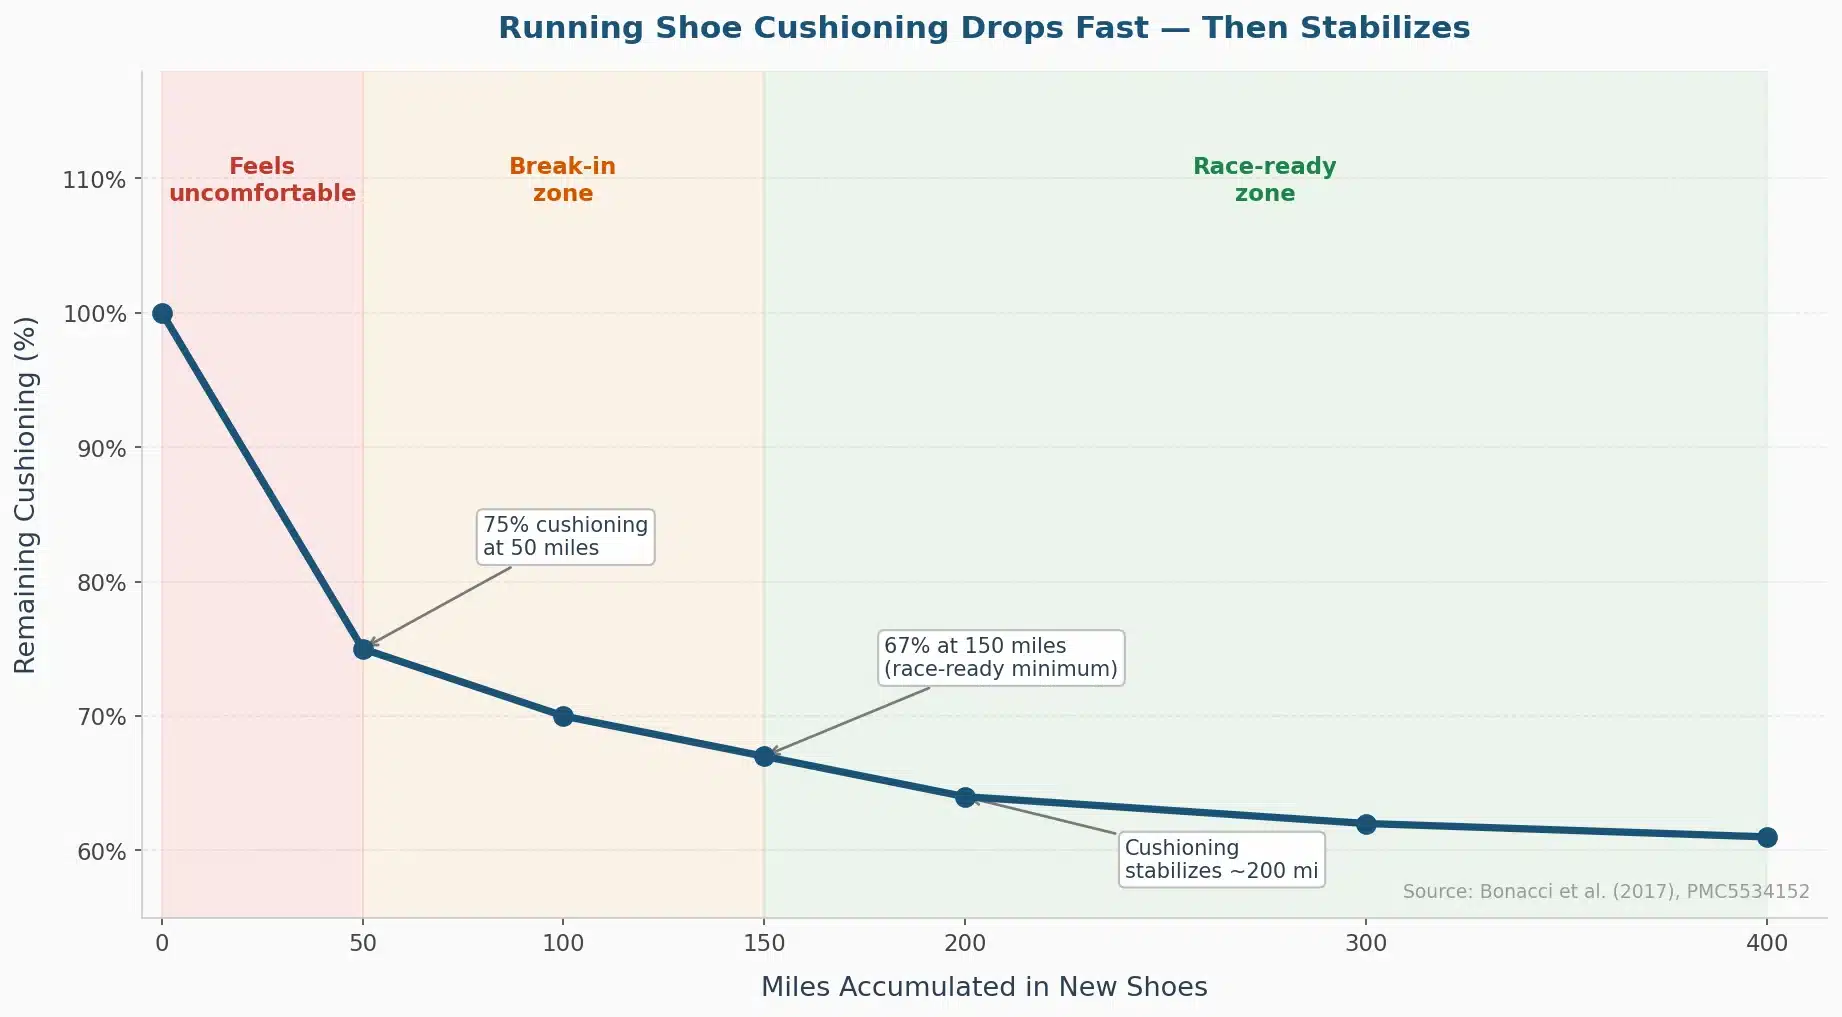
The most effective way to loosen basketball shoes is through a structured, progressive wear schedule. Rushing into full-court play risks blisters, joint strain, and premature shoe failure.
Start with Indoor Wear Only
Begin by wearing your new shoes indoors for 20 to 30 minutes a day during light activities like watching TV, walking around the house, or doing chores. This allows the midsole cushioning and insole to compress naturally while the upper begins conforming to your foot shape. No running or jumping yet, just passive molding.
Move to Low-Impact Walking
After two to three days of indoor wear, progress to short outdoor walks around the block, to the store, or during warm-ups. Walking applies gentle flex to the forefoot and heel, encouraging natural crease formation. This phase typically takes one to two days and helps soften the sole without stressing seams.
Test with Drills, Not Games
Next, wear the shoes for shooting drills, footwork exercises, or light layup lines. These movements simulate game-like flex without full lateral stress. If you feel no hot spots or pinching after two sessions, you are ready for scrimmage play. Otherwise, return to walking or use targeted stretching techniques.
Rotate with Broken-In Shoes
During practice weeks, alternate between your new pair and a trusted, well-worn pair. This gives your feet a break while ensuring the new shoes get consistent wear. Rotating also prevents overuse injuries and extends the life of both pairs.
Manual Stretching Techniques That Work
When gradual wear is not enough, manual stretching delivers faster results, especially for tight forefeet or stiff soles.
Bend the Forefoot Daily
Hold the shoe by the heel and toe box, then gently bend it back and forth 20 to 30 times. This mimics running motion and softens the midsole and upper. Focus on the natural flex zone just behind the ball of the foot. Do this for two to three minutes daily, ideally after wearing the shoes when materials are warm.
Use a Towel for Deep Flexing
Roll a bath towel tightly and place it under the forefoot area of the shoe. Press down firmly on both heel and toe to create a deep bend. For more pressure, stand on the heel while pushing the toe down. Hold for 30 seconds and repeat five times. This stretches the sole and upper simultaneously, ideal for stiff leather or hybrid uppers.
Use Mechanical Stretchers and DIY Aids

For persistent tightness, mechanical tools apply constant, controlled pressure to expand specific zones.
Try a Shoe Stretcher with Attachments
Insert an adjustable shoe stretcher and tighten it slightly, just enough to feel resistance. Leave it in overnight. Use side arms to target bunions or tight midfoot areas. For heel slippage, use a heel-expanding attachment. Repeat nightly until fit improves. This method works best on leather and structured synthetics.
Stuff with Socks or Damp Newspaper
Sock stuffing involves bunching three to four pairs of socks tightly into the shoe and leaving them overnight. The outward pressure prevents shrinkage and gently expands the interior. For the damp newspaper method, soak newspaper in water, squeeze out excess, and pack it into the toe and sides. As it dries, it expands and stretches canvas, leather, or fabric uppers. Replace after 24 hours if needed. Avoid this method on all-leather shoes with glued linings, as moisture can weaken adhesives.
Try the Freezing Water Trick
Fill a zip-top bag with water, seal it tightly, and place it in the tightest part of the shoe, usually the toe box. Put the shoe in the freezer overnight. As the water freezes, it expands and pushes the material outward. Remove the ice pack in the morning. This method works best on non-leather, breathable uppers. Ensure the bag is leak-proof to protect the interior.
Heat and Spray Methods for Fast Results
When you need quick relief before a game, heat and chemical sprays make materials pliable for immediate stretching.
Use a Hair Dryer with Thick Socks
Put on two pairs of thick basketball socks, then wear the shoes. Set a hair dryer to warm, not hot, and heat tight areas like the toe box, sides, and heel for 30 to 60 seconds per spot. Keep the dryer moving to avoid scorching. Walk around for 10 to 15 minutes while the material is warm, as foot pressure stretches the upper. This method works well for synthetics and leather. Never use this technique on suede, patent leather, or plastic-heavy shoes.
Apply Shoe Stretch Spray
Buy a commercial stretch spray designed for athletic footwear. Spray it on stiff areas and follow label instructions. Immediately wear the shoes with thick socks or insert a stretcher. The solution softens fibers and allows deeper expansion. Test on a small area first to check for discoloration. Combine with heat for faster results.
Condition Leather Shoes Safely
For genuine leather models, use a leather conditioner after a brief warm water soak of 10 minutes. Wipe off excess and air-dry completely. The conditioner restores oils, preventing brittleness while allowing the leather to stretch. Never soak synthetic or mesh shoes, as water destroys cushioning and glue bonds.
Fix Fit Issues with Lacing and Insoles

Sometimes the problem is not the shoe size but how it is laced or what is inside.
Lock the Heel with a Runner’s Knot
If your heel slips, use the top eyelets to tie a heel-lock knot. Lace normally through the second-to-last eyelet, bring each lace up and through the top eyelet on the same side forming a loop, cross the laces and pull them through the opposite loop, then tighten and tie as usual. This cinches the heel down and prevents upward movement, reducing friction and improving fit.
Skip Eyelets to Relieve Pressure
For tightness across the instep, skip the eyelets over the pressure point. Lace up to that zone, then jump to the next set. This reduces tension and creates more room. Alternatively, leave the top one or two eyelets unlaced for instant relief.
Switch to Elastic Laces
Replace standard laces with elastic ones. They allow the foot to expand during play without loosening. This option works great for wide feet or swelling during long games. They are also easy to slip on and off.
Modify Inside the Shoe for Instant Comfort
Small internal changes can make a big difference in how a shoe feels without altering the structure.
Wear Thicker or Thinner Socks Strategically
Double socks work well during early wear sessions. Wear two thin pairs. The extra volume helps stretch the upper and cushions against blisters. If the shoe is only slightly tight, switch to seamless or compression socks. Less bulk means less pressure, ideal for narrow fits.
Swap the Insole Temporarily
If the stock insole feels too thick, replace it with a thinner one during break-in. This creates immediate room. Once the upper loosens, reinstall the original insole for full support.
Protect High-Friction Zones
Apply moleskin or tape to the heel, pinky toe, or ankle collar to prevent blisters. Rub petroleum jelly or foot balm on hot spots to reduce friction. Insert gel heel pads to cushion the Achilles and stop rubbing. Test at home first to ensure no slippage.
Avoid These Common Mistakes
Even with the best intentions, improper techniques can ruin your shoes or cause injury.
Never Soak Non-Leather Shoes
Water destroys adhesives, compresses foam cushioning, and causes odors. Only use moisture on leather, and always air-dry slowly. Never use a dryer, heater, or direct sun.
Do Not Use High Heat on Plastics
Hair dryers on high settings, ovens, or radiators can melt synthetic overlays, warp soles, and weaken glue. Stick to warm, not hot, and keep the dryer moving.
Skip the Wear Them to Death Approach
Playing a full game on day one is the fastest way to get blisters and damage the shoe structure. Break in gradually. Your feet and shoes will thank you.
Stop When Comfortable, Not Loose
Overstretching leads to loss of support, seam tears, and heel slippage. Stretch just enough to eliminate pressure, not so much that the shoe feels baggy.
Maintain the Fit After Breaking In
Once your shoes are perfectly molded, preserve the fit to extend their performance life.
Use Cedar Shoe Trees Daily
Insert cedar shoe trees after every use. Cedar absorbs moisture, fights odor, and maintains the shoe’s expanded shape. It also prevents the upper from shrinking back.
Store Properly
Keep shoes in a cool, dry place away from sunlight. UV rays degrade materials and fade colors. Avoid leaving them in hot cars or damp gym bags.
Check for Wear and Compression
Inspect insoles and midsoles monthly. If they feel flat or unresponsive, consider replacing the insole or retiring the shoe. A collapsed cushion defeats the purpose of a perfect fit.
Frequently Asked Questions About Loosening Basketball Shoes
How long does it take to break in new basketball shoes?
The break-in period varies by material. Mesh and knit shoes may feel comfortable within a few days. Synthetic shoes typically take one to two weeks with regular wear. Leather shoes require the longest time, often three to four weeks of consistent use before reaching optimal flexibility.
Can I use a washing machine to loosen my basketball shoes?
No. Machine washing can destroy adhesives, damage cushioning, and warp the shoe structure. It also risks shrinking certain materials. Stick to hand methods like damp newspaper stuffing or targeted stretching instead.
Will stretching make my shoes too big?
If you follow the guidelines and stop when comfortable, your shoes should not become too loose. Overstretching is the real risk. Apply pressure gradually and check the fit often. Stop immediately if the shoe feels baggy or unstable.
Is the freezing water method safe for all basketball shoes?
This method works best on fabric, canvas, and mesh uppers. Avoid freezing shoes with leather or glued components, as ice expansion can damage stitching and adhesives. Always use a leak-proof bag and remove it promptly.
What is the fastest way to loosen tight basketball shoes before a game?
The hair dryer method combined with thick socks provides the quickest results. Heat the tight areas for 30 to 60 seconds while wearing double socks, then walk around for 10 to 15 minutes. This technique can provide noticeable relief in under 20 minutes.
Should I size up instead of trying to stretch my shoes?
If your shoes are significantly too small, stretching may not provide enough room. It is better to ensure proper fit from the start. There should be about a half-inch of space between your longest toe and the shoe end. If pain persists beyond two wear sessions, consider consulting a podiatrist or trying a different size.
Key Takeaways for Loosening Basketball Shoes
Loosening basketball shoes is a blend of science and strategy. Start with gradual wear, then add targeted stretching only if needed. Match your methods to your shoe’s material, prioritize safety, and never sacrifice long-term durability for short-term comfort. The break-in process cannot correct a fundamentally poor fit, so always ensure you start with the correct size, allowing a half-inch of space between your longest toe and the shoe end.
With the right approach, your new basketball shoes will go from stiff to seamless. You now have the knowledge to prevent blisters, reduce injury risk, and play at your peak. Start with indoor wear, progress through low-impact activities, and use mechanical or heat-assisted methods only when necessary. Your feet will feel the difference, and your game will follow.