Throwing a ball in soccer isn’t as simple as it looks. Unlike other sports, soccer throw-ins come with strict FIFA rules and require precise technique to be effective. Whether you are a beginner or looking to sharpen your skills, mastering how to throw a ball in soccer correctly can turn a routine restart into a powerful attacking opportunity.
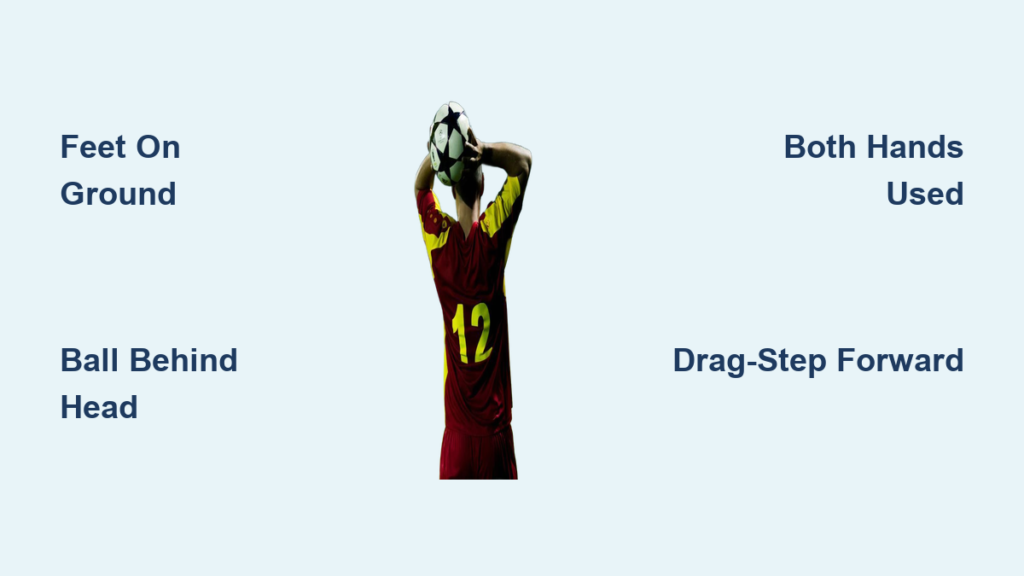
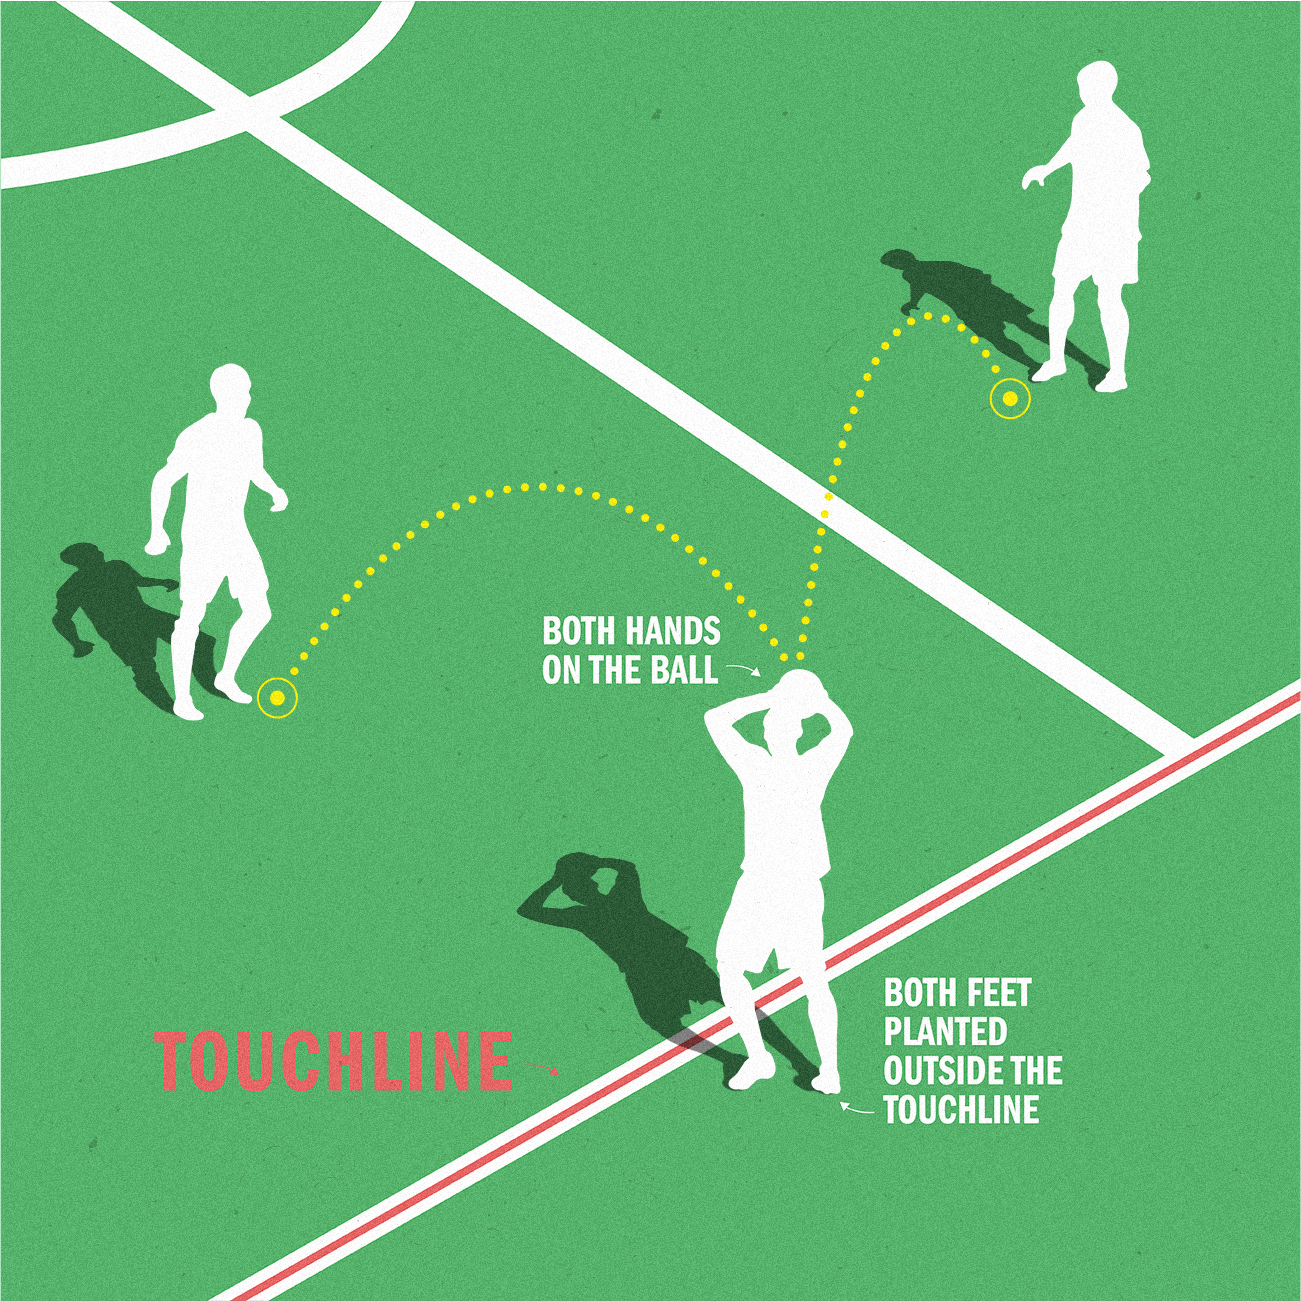
A legal throw-in requires both feet on or behind the touchline, the ball thrown from behind and over the head using both hands, and no jumping or lifting of the feet. Done right, a strong throw-in can cover 30 to 40 yards, rivaling a corner kick in tactical value. But one mistake, like lifting a foot or releasing the ball at chest level, and possession is handed to the other team.
Correct Starting Position for Your Throw-In
Your setup determines the quality of your entire throw. Getting into the right position before you approach the line gives you the foundation for power, accuracy, and legal compliance.
Step Back for Momentum
Begin three to four paces behind the point where the ball crossed the touchline. This starting distance gives you space to build speed before your throw. A short run-up increases power without breaking the rules, as long as you stop with both feet behind the line at release.
Elite players use this run-up to generate force, turning static throws into dynamic attacks.
Face the Field Fully
Always face the field of play before initiating the throw. Turning sideways or backward violates the rules and will result in a turnover. Your shoulders should be square to the pitch, eyes scanning for targets before you begin.
Prepare for the Approach
Keep your body balanced and knees slightly bent. Hold the ball with both hands, ready to bring it behind your head as you step forward. The goal is a smooth transition from run-up to throw, no stutter steps or pauses that telegraph your intent.
Legal Foot Placement and Movement
Foot placement is where most throw-ins are called foul. Understanding exactly what your feet must do keeps you legal and powerful.
Keep Both Feet Grounded
The most common throw-in foul is lifting a foot off the ground during release. To stay legal, both feet must remain in contact with the ground. No jumping, hopping, or leaving the surface. Even a slight hop invalidates the throw and gives the ball to the opponent.
Front Foot Just Behind the Line
Plant your front foot just before the touchline, not on it, not over it. This ensures you do not cross into the field during release. Position it slightly ahead of the back foot for stability and power transfer.
Drag the Back Foot Forward
Use the drag-step technique: slide your back foot forward along the ground as you throw. This maintains contact with the surface while adding momentum.
Dragging the back toe satisfies the both feet on ground rule while boosting distance by up to 20 percent compared to standing throws.
Avoid Illegal Movements
Never jump both feet off the ground. Never lift the back foot before release. Never step onto the field before the ball leaves your hands. These errors are easy for referees to spot and result in immediate turnover.
Proper Hand Grip and Ball Control
Your grip determines control, power, and whether your throw is legal. The right hand position makes everything else easier.
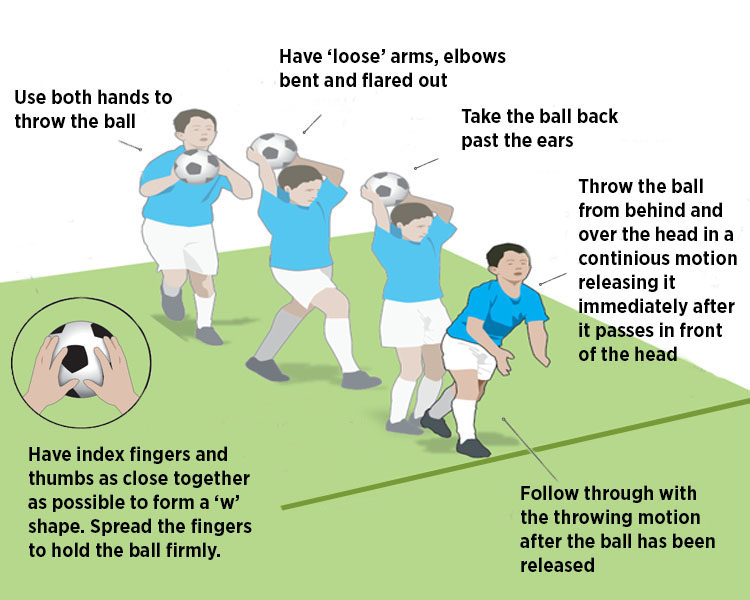
Use Both Hands Equally
A legal throw-in requires two-handed release. One-handed throws, even if brief, are illegal. Train muscle memory to engage both arms equally during the throw.
Thumbs Together Behind the Ball
Form a triangle grip by placing thumbs side by side behind the ball. Fingers wrap around the sides and palms press against the outer surface. This grip maximizes control, reduces slippage, and aligns your wrists for a clean overhead release.
Think of holding a dinner plate with both hands behind it, stable, balanced, and secure.
Elbows Bent and Behind Head
Before throwing, bend elbows and pull the ball fully behind your head. This pre-loads your shoulders and upper back, setting up a powerful extension. Avoid starting the throw from the chest or side, this breaks the behind and over the head rule.
Step-by-Step Throw-In Execution
Follow these sequential steps to execute a legal, powerful throw-in every time.
Step 1: Run-Up and Approach
Take three to four quick steps toward the touchline. Use this momentum to power your throw, but do not overextend. Time your final steps so you arrive at the line with balance and control.
Pro tip: Vary your run-up length to disguise long versus short throws.
Step 2: Plant and Position
As you reach the line, stop with front foot just behind the touchline. Keep back foot on the ground, ready to drag. Rotate hips and shoulders to face the field. Your stance should be athletic, knees bent, core engaged.
Step 3: Bring Ball Behind Head
Lift the ball fully behind your head with both hands. Make sure it passes behind your body line. A side or chest-level start is illegal. Check: Can you see the ball in your peripheral vision? If not, it is not far enough back.
Step 4: Extend Arms and Release
Drive your arms forward and upward in a smooth arc. Push through shoulders and triceps. Release the ball just above the forehead. Aim for an upward trajectory, not a flat or downward chuck.
Releasing too low results in a foul. Releasing behind the head results in turnover.
Step 5: Follow Through and Stay In Bounds
After release, let your arms continue forward naturally. Keep both feet on the ground until the ball is gone. Do not step into the field. A clean follow-through improves accuracy and prevents fouls.
Generate Power Like a Pro

Power in a throw-in comes from full-body coordination, not just arm strength. Understanding the kinetic chain helps you maximize distance.
Use the Kinetic Chain
Power comes from full-body coordination. Legs drive the initial movement. Core rotates to transfer force. Shoulders and arms extend to launch the ball. Skipping any link reduces distance and control.
Maximize Momentum with Drag-Step
The drag-step is key to long throws. Back foot slides forward during release. It maintains ground contact, which is legal. It adds lower-body drive to upper-body throw.
Players like Rory Delap used this technique to launch throws into the penalty area, changing game outcomes.
Train for Distance and Arc
Aim for a high, arcing trajectory, not a flat pass. This allows teammates to attack the ball in the air, similar to a corner kick. Practice releasing at the peak of your reach to maximize height and hang time.
Avoid Common Throw-In Mistakes
Knowing what not to do is just as important as knowing the correct technique. These errors cost teams possession regularly.
Releasing Below the Head
Throwing from chest level or sidearm results in an automatic foul. The opponent gets the ball. Fix this by drilling the ball behind head motion daily. Use a mirror or video feedback.
Chucking the Ball Downward
Dropping shoulders and hurling the ball down results in loss of control and turnover. The referee will whistle it dead. Fix this by focusing on upward release. Imagine throwing the ball over a car in front of you.
Standing Still with No Run-Up
Taking no steps before the throw produces a weak, short throw with no surprise element. Fix this by using a three to four step approach every time, even for short passes.
Lifting the Back Foot
Raising the back foot before release results in a foul throw. The ball goes to the other team. Fix this by practicing dragging the back toe. Place tape on your shoe to feel ground contact.
Poor Grip or One-Handed Finish
Letting one hand dominate or lose grip produces a wobbly throw with reduced power. Fix this by strengthening grip with medicine ball drills. Emphasize equal hand pressure.
Practice Drills for Better Throws
Consistent practice builds the muscle memory needed for game-day reliability. These drills develop form, power, and accuracy.
Mirror Drill for Form Check
Stand in front of a mirror and go through your throwing motion slowly. Watch for ball path behind the head, elbow position, and foot contact. This visual feedback helps correct flaws before they become habits.
Wall Throw Repetition
Face a wall six to ten feet away. Perform 20 to 30 throws using full technique. Focus on clean release and follow-through. This builds muscle memory and grip strength.
Partner Distance Challenge
Pair up with a teammate. Start 20 yards apart. Gradually increase distance with each successful throw. Measure max throw after 10 rounds. This tracks improvement and motivates competition.
Accuracy Grid Training
Set up cones or markers in a five-by-five grid on the field. Assign point values. Center equals five points. Outer zones equal one to three points. Take 20 throws and score yourself. This improves precision under pressure.
Slow-Motion Video Analysis
Record your throws from the side and back. Check foot placement. Confirm ball goes behind head. Verify release point. Even professionals use this to refine their technique.
Tactical Uses of the Throw-In
A throw-in is not just a restart. It is a set-piece opportunity that can create scoring chances.
Long Throw as an Attacking Weapon
Near the opponent’s half, a long, high throw can bypass the midfield. It can target tall players in the box. It can create scoring chances like corner kicks. Teams train long throw specialists to exploit this tactic.
In youth and amateur games, a strong throw-in can be the most dangerous set piece.
Quick Throw to Maintain Pressure
When defenders are out of position, take the throw immediately. Hit a nearby teammate. Sustain offensive pressure. Quick throws catch teams transitioning and can lead to turnovers.
Fake Throws and Deception
Use eye contact and body language to fake a long throw. Look deep, then pass short. Delay slightly to draw defenders in. This adds unpredictability and opens passing lanes.
Rules Refresher: Stay Legal Every Time
Before every throw, confirm you meet all requirements. Missing one means losing possession.
Must-Have Checklist
Confirm these points before every throw.
Both feet must be on or behind the touchline. Both feet must be in contact with the ground. Ball must be thrown from behind and over the head. Two hands must be used throughout. You must be facing the field of play. Opponents must be two or more meters away.
Miss one requirement and the throw goes to the opponent.
What Happens on a Foul Throw?
If the referee calls a foul, the opponent gets the throw-in. No yellow card is given unless the infraction is repeated or unsporting. Stay disciplined and do not give away possession needlessly.
Can You Score from a Throw-In?
No, a goal cannot be scored directly from a throw-in. If the ball goes into the opponent’s goal, it results in a goal kick. If it enters your own goal, it is a corner kick for the other team. However, you can assist a goal. Many goals come directly from throw-in assists.
Age-Appropriate Coaching Tips
Different age groups need different approaches. Keep instruction matching developmental level.
For Young Players Ages 5-10
Keep it fun and simple. Use cues like Superhero Throw to encourage full-body motion. Focus on two hands and feet down. Play Red Light, Green Light to practice stopping at the line. Avoid technical overload. Build confidence first.
For Teens and Adults
Emphasize tactical awareness. Focus on long-distance technique. Stress consistency under pressure. Incorporate game-like scenarios in training.
For Competitive Teams
Assign a dedicated long-throw player. Design set-piece routines off throws. Use video review to analyze opponents throw-in weaknesses. Treat throw-ins like corners or free kicks. Plan them.
Key Takeaways for Mastering Soccer Throw-Ins
Knowing how to throw a ball in soccer goes beyond just getting the game going again. A well-executed throw-in is a strategic tool that can shift momentum, create chances, and surprise opponents.
Master the fundamentals. Legal form means feet down and ball over head. Power generation comes from run-up plus drag-step. Accuracy and timing mean targeted, deceptive throws.
Then practice relentlessly. Film yourself. Drill the details. Turn every touchline stoppage into a potential advantage.
With the right technique, your throw-in will not just restart play. It will advance it.
Frequently Asked Questions About How to Throw a Ball in Soccer
What are the basic rules for a legal soccer throw-in?
A legal throw-in requires both feet on or behind the touchline, both feet in contact with the ground at release, the ball thrown from behind and over the head using both hands, and you must face the field of play. Opponents must stand at least two meters away.
How far can a powerful soccer throw-in travel?
A well-executed throw-in can cover 30 to 40 yards. This rivals the distance of a corner kick and makes the throw-in a valuable attacking weapon when executed properly.
What is the drag-step technique in throw-ins?
The drag-step technique involves sliding your back foot forward along the ground during the throw. This maintains ground contact, satisfying the legal requirement, while adding momentum and increasing throwing distance by up to 20 percent.
Can you score directly from a throw-in in soccer?
No, you cannot score directly from a throw-in. If the ball enters the opponent’s goal, it results in a goal kick. If it enters your own goal, it results in a corner kick for the opponent. However, throw-ins frequently lead to assists and goals.
What is the most common throw-in mistake?
Lifting either foot off the ground during release is the most common foul. Players must keep both feet in contact with the ground throughout the throwing motion. The back foot should slide forward, not lift up.
How can I improve my throw-in distance?
Use a three to four step run-up approach. Practice the drag-step technique to add momentum. Focus on full-body kinetic chain, driving from legs through core to arms. Train regularly with distance and accuracy drills to build consistency.